Good morning friends!
I couldn’t possibly be any more excited to be here guest posting for one of my very best blogging buddies, Breanna, today!!! Just in case we haven’t had the pleasure of crossing paths yet, I’m Kristi, the gal behind making it in the mountains where I share all sorts of budget friendly DIY projects as we work to transform our builder basic home into a rustic mountain retreat.
When Bre asked me to share a project on her blog while she was away (let’s not even get into how jealous I am of the sun and sand she is enjoying right now!), I knew just what to share. You see, ever since completing this table transformation for our Kitchen last Summer, my Mom has been begging for one of her own too. So, you can imagine how happy I was when I came across an almost identical table for her in Sal Val a few months before Christmas. And, even better, I knew exactly what I wanted to do with it!
Well my friends, I’m pretty darn excited to show y’all how I transformed this new-to-me table today!
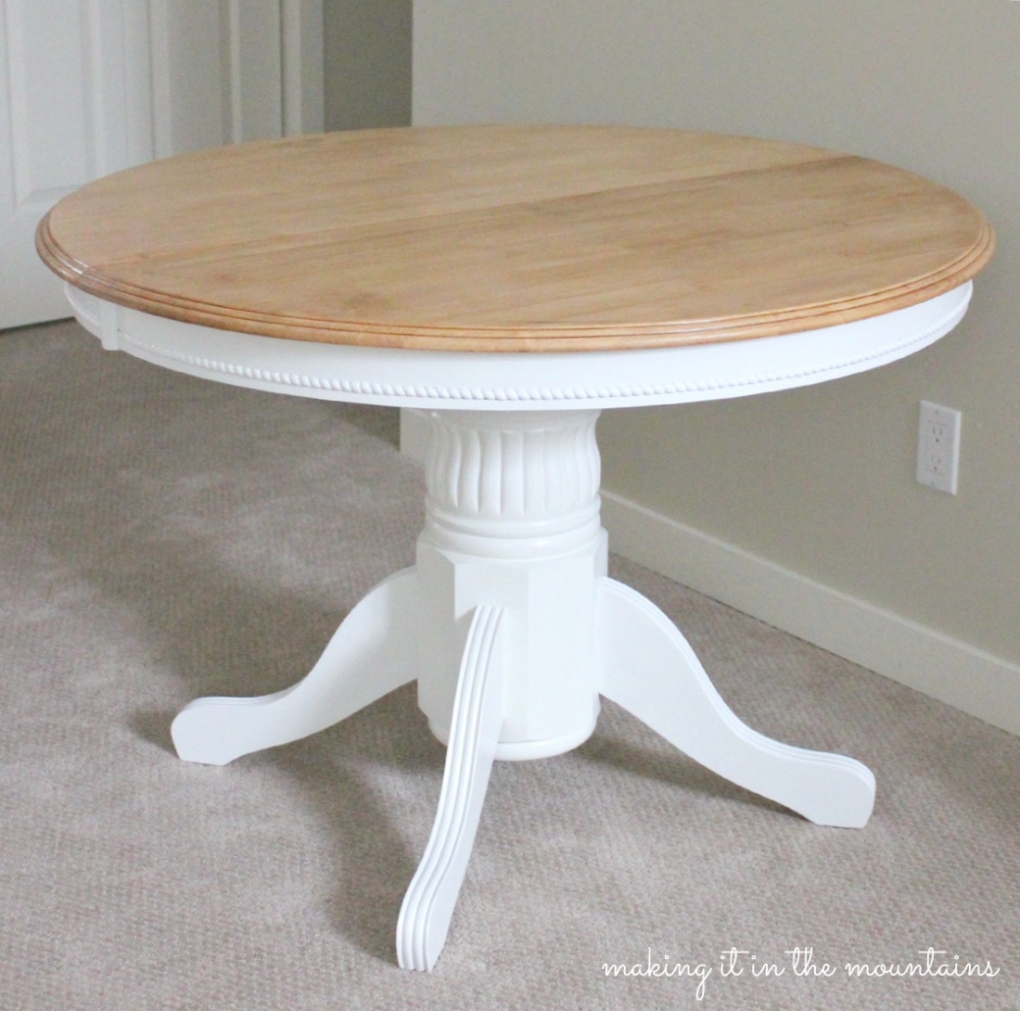
Before anything else could happen, I had to sand that top down. And, after learning how to refinish a table the hard way with my last Kitchen Table Makeover, I made (relatively) quick work of this one. This time I actually followed these instructions, starting with the most abrasive (or lowest number) grit sandpaper first and moving onto the finer (or higher number) grits as things progressed. Things were running along just as they should be until it came time to sand the edge around the table top …. hmmmm, I just knew this was all going much too smoothly this time around! No matter how hard I tried, I couldn’t figure out a way to make that palm sander get into the grooves around the edge of that table top. Seriously, this sander couldn’t have felt any smaller when I was working away at the top for what felt like an eternity, but now when I needed it to work it’s itty-bitty magic, that little sander decided to show me just how big it really was instead! Figures! So, I did what any busy gal working hard to finish a project 3 days before Christmas would do, I gave it everything I had for about five minutes with a sanding block and when I noticed it could easily take me until next Christmas to bring it down to the bare wood, it became a half-hearted effort to get the worst of it off. In the end, this was the best I could do – as any DIY’er can tell you, it’s always important to let some of the original “character” shine through! Right?!

Once done with that epic sanding adventure, I moved on to staining the top the most perfect light oak colour. I first wiped everything down with a tack cloth to remove any trace of sanding mess, then painted on a coat of wood conditioner to keep the stain colour as even as possible. After letting that dry for 30 minutes, I moved on to my Varathane Oil Base Stain in Ipswich Pine. This turned out to be the most beautiful light oak colour without being too orange – thank goodness! I ended up adding two coats of stain, letting them dry for a few hours in between as per the directions on the can. Finally, I finished the top up with three coats of Varathane Water-Based Polyurethane in a satin finish to protect my hard work. Though I went with oil stain to achieve the best colour, I chose to use water-based poly to not only keep clean up easy, but to prevent the poly from yellowing over time as oil-based tends to do.
Now that I was done with the top, it was time to show the bottom some love. I pulled out my Country Chic Chalk Paint in Simplicity White and slapped on 3 coats of paint (taking care not to paint the table top of course!). Those of you that have been following along with my adventures for a while know my love for this amazing paint … with absolutely no prep (aside from wiping off the sawdust), painting the bottom of my table was by far the easiest part of this project! Instead of finishing things off with a coat of clear wax like usual, I decided to add a couple coats of Country Chic’s Tough Coat to protect the paint. Guaranteed to not alter the colour, this seemed like the perfect way protect against scratches or normal wear and tear.


I am SO in love with how this turned out! It was totally worth each and every minute and I just know my Mom is going to fall head-over-heels in love with it too!!!
SUCH a huge thank you to Bre for inviting me to share here today! I would love for y’all to swing by making it in the mountains to see what I’ve been up to or just follow along with me on Facebook or Instagram to stay up to date with my latest projects!
making it in the mountains Project Gallery
Wishing you SUCH a lovely day!
Kristi has done some incredible table transformations in the past and this one is no different! I know her Mom must absolutely love it! A big thank you to Kristi for sharing this awesome project today!






Aldrin Netsearch
Wow! This looks amazing! This light and bright kitchen table is amazing. Love it. This is my first time to check your blog but I wasn’t disappointed. Keep blogging.
http://zeelkitchens.com.au/
Furniture Store Parker
Truly beautiful table! You did an amazing job.
Poulin Design Center
Beautiful table, you have a great taste!
Poulin Design Center
absolutely gorgeous! thank you for sharing!
Sandy
I have this exact table and now am feeling brave enough to try and re finish it. I wondered if your top had uneven spots and wasn’t smooth to begin with? Will it sand evenly? Any info you could share would be much appreciated 🙂 Thanks!
Sharon
Nice finish on the table!!! Looks fantastic. I am envious how you got the bottom with no brush strokes,,, what is your secret?
Sharon @ zoesfrontporch.com
Deborah Smith
Your table turned out gorgeous and I’m sure your mom was beyond thrilled! Thank you for sharing at What We Accomplished Wednesdays. Have a great weekend!
Blessings, Deborah
Diane | An Extraordinary Day
Thanks for joining us at Project Inspire{d}!
I’m excited to be featuring your Great Idea this week at for our weekend wrap up. Please be sure to grab a button or link back!
I can’t wait to see what you bring to next week’s party! 🙂
Camille
It’s gorgeous, well done!
Ashley @ 3 Little Greenwoods
How in the heck did you get such an awesome finish on the bottom? All that white paint is so beautiful!
Pinning!
~ Ashley
adrienne @ whole new mom
Love this. Question – how hard would it be to take a table that is painted w/ dark and bright colors and sand it down and repaint? I would like it to be a lot lighter. I have my eye on a table and chairs on Craigslist but the owner painted it Cat in the Hat red and teal :)!
Kendra @ www.joyinourhome.com
Looks absolutely great. Kristi! Love country chic paints.. I think I am finally going to tackle ours after seeing this tutorial! (p.s. Hope youre having a great holiday Bre!
Erica
Ooh, I just love this! The wood top with the white bottom is just so totally swoon-worthy 🙂
Amanda @ Dwelling in Happiness
The table turned out so pretty!! I’m loving the two toned lately. In fact, I’m working on an old dresser right now, and it pretty much has 7 or 8 coats of old nasty paint that is IMPOSSIBLE to get off with a sander!! I love letting the natural and imperfections show through! Great job, Kristi!
Katie @ Little House of Four
Great Job, Kristi! I love the combination of the natural top and the white pedestal bottom. I’m sure your mom just loves her new table!
Havok
That is one lovely table! And I love the color you chose as the stain for the top, as it still has a very natural wood color to it!
Rebekah @ Charming Imperfections
Kristi, this table turned out so pretty! I love it! You mom is very lucky to have such a sweet daughter 🙂